Invitation cards, birthday cards, wedding cards, or cards for occasions such as a first apartment or getting a driver’s license – there are lots of reasons to design your own card. Maybe you just want to say thank you to someone special. Stamp designs can help you personalize your card and give your message a finishing touch.
Using a thank you card, Birka shows you how to utilize different techniques and pens from the Tombow family to create a timeless card.


You will need the following materials for stamping and coloring a card:
- For the stamp motifs:
- Stamps (clear stamps)
- Stamp pad such like Memento Tuxedo Black
- Tombow ABT PRO marker – for coloring the stamped motifs
- I use the ABT PRO Set of 5 Pink Colors and the ABT PRO Set of 5 Green Colors
- Optional: Stamping tool
- Optional: White gel pen
- For the watercolor background:
- Tombow ABT Dual Brush Pens
- Blending Mister
- Water tank brush
- Film or blending palette
- Watercolor paper
- For the card:
- Card blank or Tombow Bristol Paper
- A tape roll like the MONO Maxi Power Tape
- Double-sided adhesive pads or MONO MULTI liquid glue
- Schere
Do you need more of this?
The main motif:
Step 1: Stamp the outlines
Select a motif that fits your card. Here, we have chosen a flower. For this, I’m using the Memento Tuxedo Black stamp pad. This is important so that the contours do not smear when coloring with the alcohol-based ABT PRO markers.
Tip: I like to use a stamping tool, because I can use it as often as I like to apply the stamp to the same exact place until I’m satisfied with the imprint. This leads to fewer mistakes.

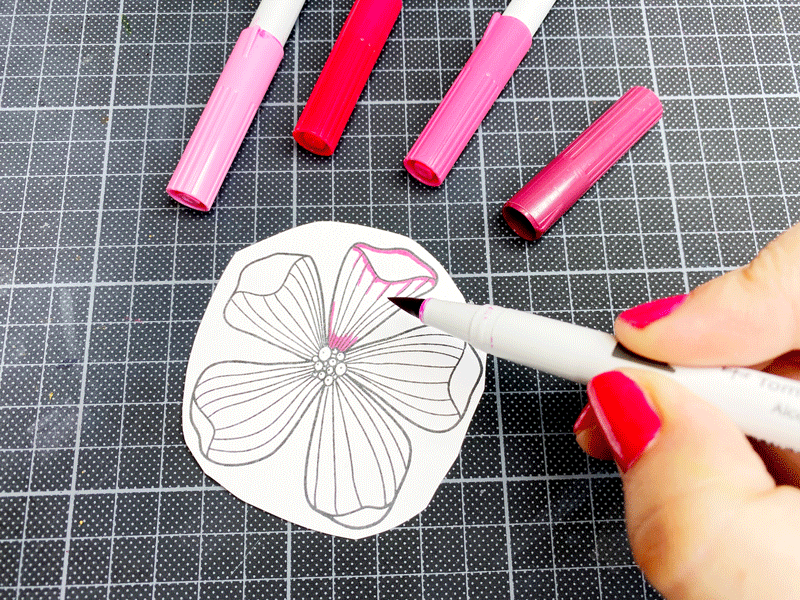
Step 2: Coloring
Now you can begin coloring in the stamp motif. For this, use the ABT PRO Color Tone Set pens in pink. The Color Tone Set pens are already color-coordinated with each other and are very easy to blend into one another. Start by using the darkest tone to color the edges and places where the flower casts a shadow. Then color over and over with the tone that is one shade lighter until you can no longer see any transition. This technique is also called blending. Depending on how well the color combination is selected, this can go quickly or take quite a bit of time. Work your way step by step from your darkest to your lightest tone.
Depending on the motif, you can place greater emphasis on certain aspects in a second round or only start with the darkest tone after having colored everything in the first time. There are no fixed rules for this. Simply try out how it works best for you!
Tip: Unlike with water-based ink, alcohol-based ink allows you to apply several layers without damaging the paper. Depending on the type of paper, however, the paper may become “saturated” and will no longer be able to absorb additional ink.

For the middle of the flower I chose two shades of purple. For small motifs, I only give a hint of the gradient since it very difficult to recognize.
Tip: Minor mistakes, such failing to stay in the lines, can be easily concealed with a white gel pen. At any rate, these won’t be visible at all after the motif has been cut out.

Step 3: Cutting out the motif
Now use a small pair of scissors to cut out the motif. In this step, I usually leave a narrow, white border. This is particularly useful for difficult motifs.

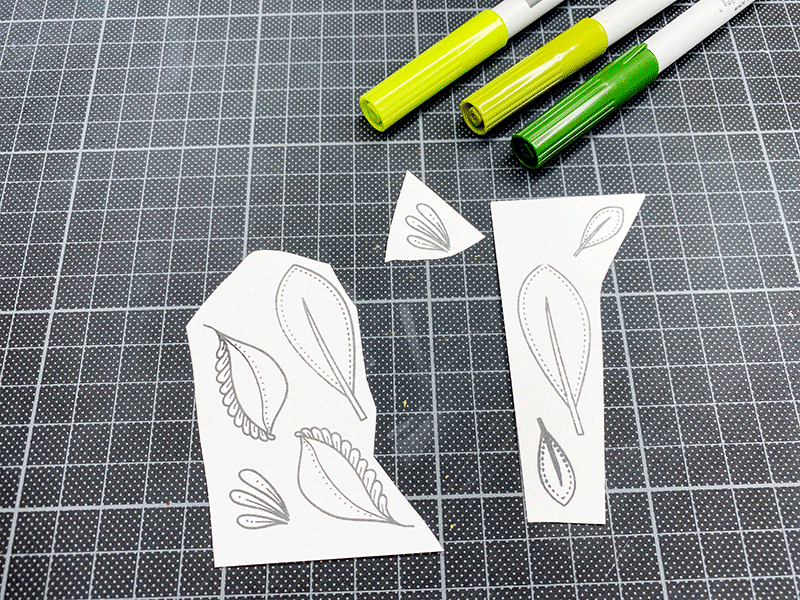
Step 4: The leaf motifs
Just like with the flower, the leaves are first stamped and then colored in. Use the colors from the Tombow ABT PRO Green Colors Set. Since they are very small motifs, a gradient from 3 different shades is sufficient.
The watercolor background
Step 5: Prepare the surface for coloring
To have a suitable surface for our watercolor splotches, divide a sheet of Tombow watercolor paper into four equal parts.

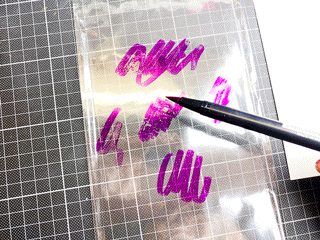
Step 6: The splotches
Thanks to being water-based, the Tombow ABT Dual Brush Pens can be used wonderfully as watercolors. Use the tip of a brush to color on a film or a clear plastic folder. Of course, you can also use a blending palette. Then use the Blending Mister to spray water on the ink until everything blends together. Now simply place the paper on the ink. Depending on how fluid your ink is, you can put the film on the paper or even better, put the paper on the film so that the ink doesn’t run down. In the second variant, you can see the result right away and correct it better.
Important: Let the background dry fully or – if available – dry it with a hair dryer.
Step 7: Ink splatters
Ink splatters are another small highlight. For this, you can apply ink using the ABT Dual Brush Pens, e.g., on a pad for acrylic paints, add more liquid using a water brush and tap it against the edge of the table so that it splatters. You can definitely also use a normal brush and let the drops of paint drip down onto the paper from above.

Arrange the card
Step 8: Put the puzzle pieces together
At the end, arrange all motifs on the background and move them back and forth until you like the layout.You can then stamp your greeting or letter it with the Fudenosuke Brush Pen.You can affix the motifs using double-sided adhesive pads or the MONO MULTI liquid glue. Everything is then glued to a folding card or Bristol paper cut to the right size using a glue roller such as the MONO Maxi Power Tape.
Tip: Using a glue roller, you can glue perfectly precise edges so that the two pieces of paper won’t come apart in one place..
Optional: If you like, you can now round off the corners or add a few accents with sequins.

Done!
Let us know how helpful this article was for you. If you have any suggestions for improvement or other feedback, we’d love to hear from you. We promise to read everything.
PS: We're also curious to see your results. Share your work with us on Instagram or Facebook and share it with the community.