The Birthday Card with a Surprise
Are you looking for a unique creative approach for birthday cards, vouchers, or money gifts? Then this exploding box is just the right thing for you. When you lift the lid of the box, the sides, which you design yourself, unfold.
Birka will show you how to make the basic exploding box and how you can decorate it for a birthday.


You will need the following materials for making and decorating an exploding box:
For the box:
- 2 sheets of paper (Tombow Bristol) measuring 21 × 21 cm and 11 × 11 cm
- Craft knife or scissors
- Optional: folding board
For the flowers:
- Tombow Aquarelle paper
- Templates for circles (e.g. hole punch, cups, etc.)
- Scissors
- Transparent film
- The following ABT Dual Brush Pens Colors:
- ABT-723 pink
- ABT-837 wine red
- ABT-803 pink punch
- ABT-373 sea blue
- ABT-443 turquoise
- Tombow Blending Mister
For the leaves:
- The following alcohol-based marker ABT PRO colors:
- ABTP 126 light olive
- ABTP 177 dark jade
- ABTP 133 chartreuse
- Bristol paper pad
- Scissors
Decoration:
- Optional: heart and hole punches
- Twine/ribbon
- Greetings stamp (e.g. clear stamps from Create A Smile) or Fudenosuke, Fudenosuke to letter your greeting by hand
- Stamp pad or ABT Dual Brush Pens
- Double-sided foam tape like the MONO MULTI liquid glue
Do you need more of this?
The Box
Step 1: Preparation
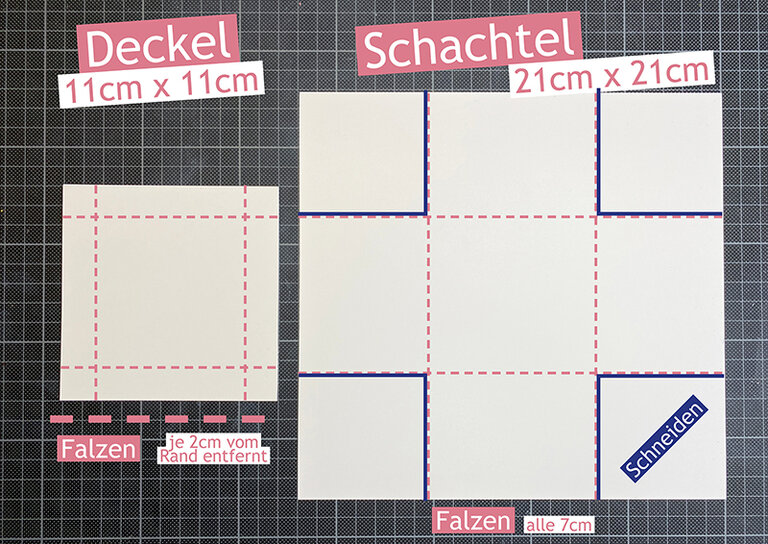
You will need two sheets of A4 paper from which you will cut two squares: one measuring 11 × 11 cm for the lid and one measuring 21 × 21 cm for the box.
Step 2: The Box
DPlace the paper for the box on the folding board and fold at 7 and 14 cm. Then do the same from the other side so it resembles a tic-tac-toe grid. You can do this without a folding board by using a ruler and a pencil to make small marks and then folding the paper by hand.
Then cut from the outer lines to the central square so that the four corners are cut away.
Step 3: The Lid
Now it’s time to make the lid. To do this, you need to fold the smaller piece of paper 2 cm in from each edge. Then you need to cut up to the central fold along the lines. BUT: only cut along one line at each corner as we need to make flaps. You will need to trim the edges of the flaps slightly at an angle so that they do not stick out when they are glued down. Now you can glue everything together with Tombow MONO MULTI liquid glue. The basic structure of the box is complete.


Step 4: Coloring
With the help of the ABT Dual Brush Pen, you can add a kind of pattern to the white box. Brush some color onto an acrylic block (you can also use normal transparent film). You can take this up with a brush and a little water and flick ink splatters over the box and the lid.


The Flowers
Step 1: Many Colorful Circles
For the flowers, you will need circles cut out of watercolor paper. I have cut out a few with differently sized hole punches. You can also draw round all sorts of objects, such as cups or lids, to make your circles. Then add some color from the ABT Dual Brush Pens to a water-resistant surface (e.g. transparent film). Dilute the color with the Blending Mister and immerse the circles in the ink from both sides until completely covered. Now you just have to let them dry or use a hair dryer.
Tip: You can choose different colors for this. I stuck to turquoise and dusty rose.


Step 2: Swirl!
Now simply cut into the circles in the form of a spiral. You do not need to keep the cutting lines an even distance apart. However, try to make the strips wider at the outside and narrower at the inside. At the end, there should be a small, round area at the center upon which everything will be glued down. Start rolling the paper up from the outside, pointed end of the spiral. When you get to the rounded end, you can glue everything down on the central circle using the MONO MULTI liquid glue.


The Decoration and the Final Box
Step 1: Lid Decoration
You can let your creativity run wild when it comes to designing the box. Cut out another square, slightly smaller than the lid. Stroke the brush tip of the ABT Dual Brush Pen carefully along the edge of the square, so that you get a colored frame. Then I selected a slogan from my stamps (a lettered sentiment from Create A Smile), which I stamped in a suitable color (Distress Oxide Pickled Raspberry and Victorian Velvet). You can also use your ABT Dual Brush Pens instead of stamp ink. Simply stroke the brush tip over the stamp, blow on it briefly and stamp. Alternatively, you can also letter the slogan onto the square yourself using the Fudenosuke..
Glue the square directly onto the lid or use double-sided foam tape so that it is slightly raised off the lid. You can now decorate the lid as you wish with the flowers you have created.


Step 2: A Heart within the Box
You can decorate the inside of the box with a heart. Cut or punch out a heart from the watercolor paper for this. You can color it in using the ABT Dual Brush Pen and give it a cool watercolor effect using a water brush. Punch or stab two holes in the heart and in the sides of the box, which you will have already connected with a piece of tape. As soon as the ink is dry, you can add a birthday greeting to the heart and then thread it onto some ribbon and hang it between the sidewalls.


Step 3: Additional Leaves
As a finishing touch, color leaves for the flowers using the ABT PRO Markers. Simply color in an area on the Bristol paper in green. Then cut out the leaves freehand. Now you just have to glue the leaves between the flowers and your exploding box is complete.


Done!
Let us know how helpful this article was for you. If you have any suggestions for improvement or other feedback, we’d love to hear from you. We promise to read everything.
PS: We're also curious to see your results. Share your work with us on Instagram or Facebook and share it with the community.