Watercolor illustration and lettering for a fully personalized greetings card!
Bring joy to your loved ones with a handmade Christmas card. With the ABT Dual Brush Pens you can create beautiful cards that combine watercolor illustrations with lettering. Laura from The Bright Side will show you how easy it is to create a card like this in her step-by-step guide.


These are the materials you will need:
To make a Christmas card you will need the following materials:
- Pencil, such as the MONO 100
- Eraser, such as the MONO plastic eraser
- paper suitable for watercolors like the Aquarelle Paper
- Water Brush or paintbrush
- Washi-Tape for straight edges
- ABT Dual Brush Pens, here in following colors:
- ABT 228
- ABT 249
- ABT 946
- ABT 177
- ABT 856
- ABT 879
- ABT 912
- ABT N15
Do you need more of this?
Step 1: Preparing the Card
Start by folding the watercolor paper in half to create a folded card. Then stick two parallel strips of washi tape horizontally across the card. This will form the area for your lettering.
Tip: Check beforehand that you can remove the tape without marking the paper.

Step 2: Holly Branches
Draw holly branches with the fine tip of the ABT-879. You should start with the main branch and then add smaller branches.
Tip: Alternate between small and large branches to give a more natural effect.

Step 3: Holly Berries
Using the ABT-856, you can suggest holly berries with semicircles. You will fill them in later using the water brush.

Step 4: Mistletoe Branches
Just as with the holly branches, you should start by drawing the main section of the mistletoe branches. Use the fine tip of the ABT-228 and the orange ABT-946.
Tip: Vary the colors by choosing several green tones.

Once you have drawn the mistletoe branches, it’s time for the leaves. Use different colors for these: for the mistletoe leaves I have chosen ABT-177 and for the holly I have used ABT-912.
Only suggest the shape of the leaf with a semicircle. In the next step, you will fill it in using the water brush.

Step 5: Add a Watercolor Effect to Your Illustration
Take your water brush and fill in the shapes you have drawn. Start with the red semicircles to create the holly berries. Then form leaves out of the other semicircles.
If you prefer a consistent watercolor style, you can stroke the water brush carefully along the branches to give them softer edges.
Tip: Wipe the water brush on a piece of kitchen towel between each color to ensure a clean result.

Step 6: Details
Once your watercolor illustrations are dry, you can use the fine tips of the ABT Dual Brush Pens to add small details.
Tip: Do not hesitate to continue adding more branches or leaves until you are happy with the result.

Step 7: Das Lettering
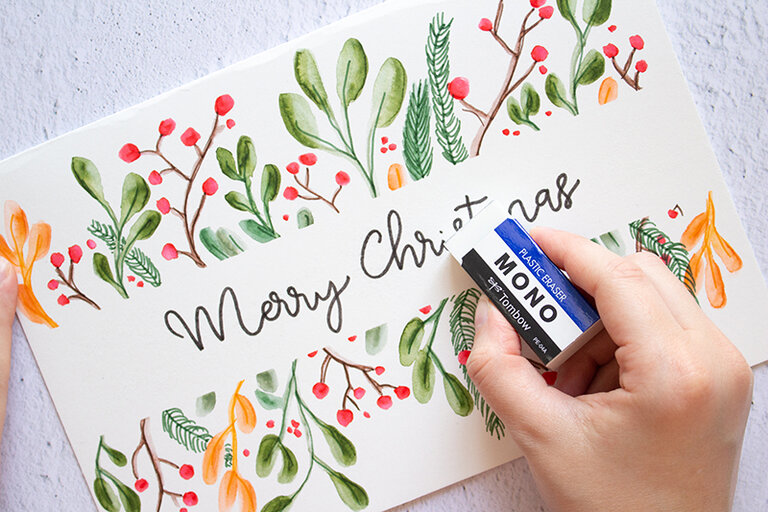
As soon as your card is finished, you can carefully remove the washi tape.
Tip: If you get the feeling that the washi tape is tearing your paper, simply warm it up a little with a hair dryer so that it is easier to remove.

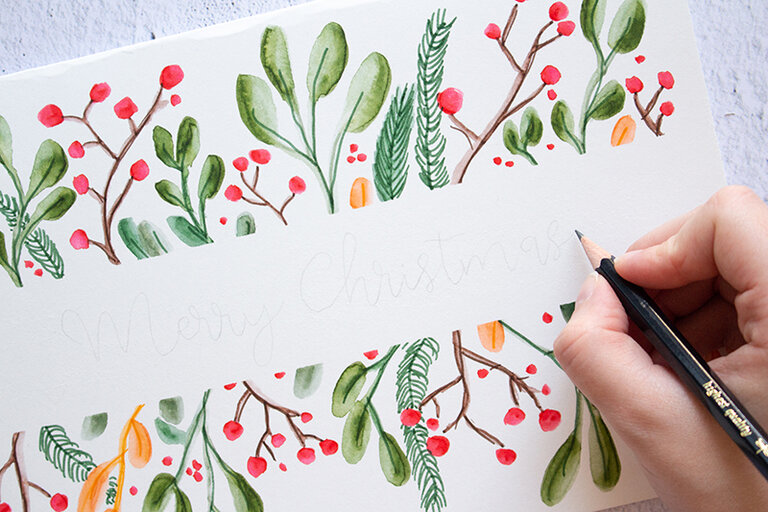
Sketch out your greeting using a pencil. This allows you to make sure it is centered.
Then choose a pen for your favorite technique: the brush tip of the ABT Dual Brush Pen or the Fudenosuke can be used for dynamic calligraphy script. The fine tip of the ABT Dual Brush Pen, TwinTones, or the MONO drawing fineliner can be used for faux calligraphy or classic script.


Done!
Let us know how helpful this article was for you. If you have any suggestions for improvement or other feedback, we’d love to hear from you. We promise to read everything.
PS: We're also curious to see your results. Share your work with us on Instagram or Facebook and share it with the community.