Blended lettering with Frau Hölle
Let Frau Hölle show you how you can master the blended-lettering technique
One week after the official launch of the Tombow Blended Lettering Sets designed by Frau Hölle, our YouTube channel featured a premiere: we visited Tanja in the Frau Hölle studio in the heart of Munich, where she hosted a live YouTube workshop all about the sets and the blended-lettering technique. In this step-by-step guide, we explain the blended-lettering technique and summarize the individual steps for you. Be sure to also have a look at Tombow Europe’s YouTube channel to see the complete video.


Linking to the video streaming service is disabled to protect your privacy. Click here to activate it. By loading the video, you accept the privacy policy of the video streaming service. Further information about the privacy policy can be found here: Google - Privacy & Terms

You will need this material for the workshop:
- One of the two Tombow Blended Lettering Sets designed by Frau Hölle
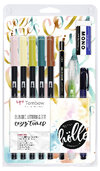
- Blended Lettering Set Good Vibes
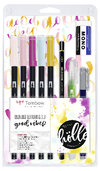
- Blended Lettering Set Cozy Times
- Tombow Watercolor paper
- Paper towel
- Optional: letter-blending pattern, – either the starter version (used here) or the advanced version
Do you need more of this?


Optional preparation
If you would like to work with Frau Hölle’s pattern, this article will tell you how to transfer the pattern to the watercolor paper.
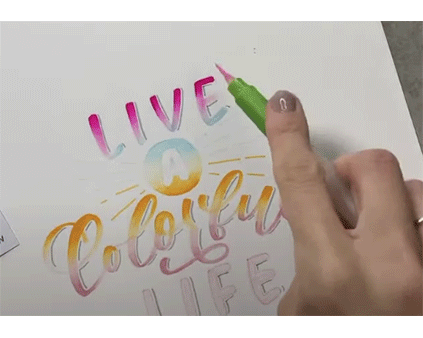
Step 1: Drawing
After you have transfered the pattern with a pencil (or sketched it yourself), you can start inking it. For this, use the lightest ABT Dual Brush Pen of the sets (in the Good Vibes Set: ABT-990). In general, a lot of pressure is used for the lettering’s downward strokes, and little pressure is used for upward and horizontal strokes.
Please note: The preliminary drawing is essential as a guide to define the areas of blending. If the preliminary drawing is in the same color family as the blending, it doesn’t change the colors.

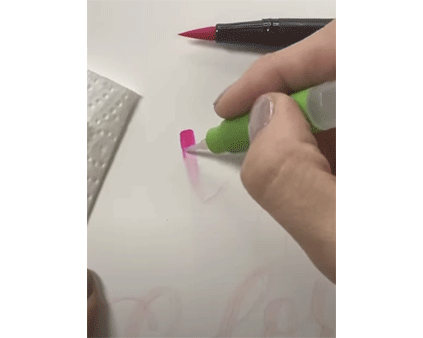
Step 2: The first color: the blending begins
For a linear type of blending, you start at the top and carefully apply a little bit of the ABT-725 color there, using little pressure. With a water brush that is damp but not too wet, start to slowly dissolve the ink under the inked surface and carefully work the ink into the areas below. If you’ve absorbed too much ink with your water brush, simply wipe it on some paper towel.
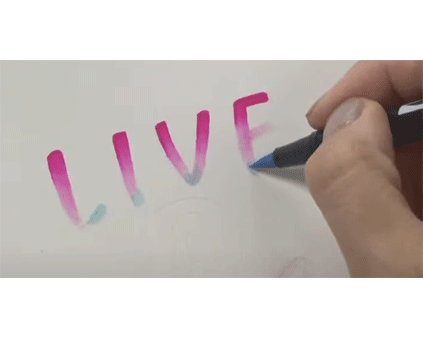
Step 3: Time for the second color
Once you’ve made a delicate transition with the ABT-725, it’s then time for the second color. Using the ABT-451 and the same technique, create a color gradient from fuchsia to blue by applying gentle strokes with the water brush.
Tip: You can see if ink has not come into contact with water, so be sure to activate each area with the water brush in order to achieve a harmonious effect.
Step 4: Blending the A
In our pattern, the A has a special quality because the ink is not blended around the letter. That creates the effect that the letter itself remains white. Begin the blending process again – now with the ABT-451, which you already used in the line above. Below, work with the ABT-985 and slowly blend it into the blue area. You can color in the hole of the A also with the blue tone.
You can apply more ink with the ABT-451 as it is a very light color. You need to use less ink with the ABT-985.

Step 5: Blending with flourishes
In the next line of our lettering the letters are more curved and feature flourishes. You should first do the entire top part of the lettering using one color (here ABT-985) to thin out the ink toward the bottom. Then blend the areas with the light-pink ABT-800.

Step 6: Outlining
To create more contrast in your lettering, you can outline the last word “LIFE” with the fine tip of the ABT-772.

Step 7: Finishing with ink drops and shadowing
If you like, you can also add additional shadowing around the individual letters with the Fudenosuke.
And to add a finishing touch to your blended-lettering work, you can also add drops of ink around the lettering. To do that, apply some ink to the blending palette and add lots of water to it using the water brush. Use the water brush to pick up the diluted ink and let drops of paint drip onto your paper by gently tapping the brush.
Tip: Cover the lettering with your hand to prevent drops from landing directly on the words.
Done!
Let us know how helpful this article was for you. If you have any suggestions for improvement or other feedback, we’d love to hear from you. We promise to read everything.
PS: We're also curious to see your results. Share your work with us on Instagram or Facebook and share it with the community.